 goodworksfurniture Decoration and home design ideas

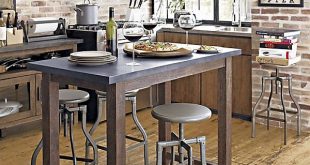
Diy kitchen island – The kitchen, one of the busiest areas of any home, tends to be short of space, especially in apartments, condominiums, and smaller apartment buildings. When you have more space than kitchen counter and cabinet space, a kitchen island can be a tight space solution for the kitchen. IKEA, the retailer of ready-to-assemble household items, has several models of kitchen islands to buy, but you can make an island out of the attractive, useful, and less expensive kitchen with a couple of tables.
The lack of IKEA, a butcher block lid and the glue. Acquire and assemble two easy DIY kitchen islands the lack of IKEA. Make sure they are put together properly and are tough. Stack the two IKEA lacquer side boards on top of each other. Secure the boards together by placing a square of glue on the underside of the legs of the top table.
Make sure that the table legs on the surface of the table line up exactly with the table legs of the DIY kitchen island Ikea below. Firmly press the top of the table onto the surface of the table of the lower table. So that it sticks and stays good. Line the outer edge of the main island with the glue and place several squares in the middle base. Firmly press the top of the butcher’s block onto the top of the auxiliary table.